Tuesday, December 18, 2012

12 Projects: Stocking Stuffers


Stuffing a stocking can get very expensive very quickly.  Just because things are small, doesn't mean they are inexpensive.  But stuffing stockings is so much fun! For today's post I'm going to share with you some of my favorite stocking stuffer ideas.  I will not be sharing the actual stocking stuffers I may or may not have made, because their recipients may be reading.


Mint Chocolate Blossoms, adapted from The Cooking Photographer

Edible gifts:  A mini loaf of bread or a packet of cookies will make someone smile.  For kids, try homemade candies.  It's a great excuse to try something new in the kitchen, but not have all those tasty treats haunting you.  If you don't bake, try a jam or jelly from a local vendor.   Pinterest is a great place to find recipes (as well as new blogs to follow), but don't forget the recipes that come from the food companies.  I'm in the process of making these sandwich cookies from Ghirardelli, and I always follow the recipe on the back of the chocolate chip bag.  Snack Picks has a whole slideshow of tasty looking holiday ideas.

Photo from Leethalknits

Small Knitwear: This one is a little more time consuming, but ends in a big payoff.  You could knit a simple hat, like Leethal's scant, pictured above.  You could also put together a pair of wrist warmers, or even a coffee cup cosy!  There are tons of free and low cost patterns to be found on Ravelry.  Looking for something even smaller?  Try this crochet necklace from The Making Spot.

Photo from Make and Takes

Health and Beauty: Rice bag tutorials are all over Pinterest, and they are a great useful stocking stuffer.  The photo above is from a tutorial over at Make and Takes.  Once you have the general idea, you can make these in any shape or size.  I even made these with kids at the library once.  I pre-sewed the bags out of white cotton so they could decorate and fill them.  we closed off the bags with iron on hem tape.  A simple body scrub is also an easy stocking stuffer idea.  Check out this tutorial for lavender foot scrub over at Frugal Granola.

What kind of homemade presents are you making this year?  What do you like to stuff in stockings?


Missed something?  Check out The 12 Projects of Christmas.


Monday, December 17, 2012

12 Projects: Ornaments


Homemade ornaments are a great personal touch to any Christmas tree.  I know one of my favorite parts of decorating the tree with my family was pulling out the ornaments I had made throughout my childhood.  A few have made their way to my tree at home, but most still stay with my mother.  Like my angel tree topper, they are a part of every Christmas.  Here are a few simple homemade ornaments I tried out this year!

First, I took inspiration from Snowflakes and Dragonflies and her glittered light bulbs that have been going around Pinterest.  I had a few that I had bought a few years ago as replacements and never used.  They've just been sitting in my Christmas box.  


I could have painted them with glitter modge podge like my tree topper, but I wanted to use the big glitter, so I painted each with modge podge and sprinkled the glitter on top. 


I saved the extra glitter from my pine cone mini tree, so they are gold and red.  I also decided to break out my old friend Epsom salt to make a few snowy bulbs.


I wrapped the tops with ribbon and looped it to make a little hanger.  These would look really cute attached to a gift, or hung on a hanger with the stocking of a loved one!  


I also wanted to crochet some stars. I bought some white yarn with silver metallic thread, and used this super simple pattern from summerfete. 


When I finished the star, I slip stitched up to one point, and chained until I made enough to form a loop, and i slip stitched it closed.


Cute little white star!  These are soft and great for low hanging ornaments around pets and small children.  They are also flat, so they can be mailed inside cards!

Here are some great links to other ornament tutorials!  I hope you find the perfect ornament to place on your tree!

Photo from The Witchcraft
Speaking of ornaments you can mail, this adorable paper craft ornament from The Witchcraft is attached to a card for easy gift giving.  When you pull the string, it turns into a little Christmas tree!  The website is in Japanese, but your browser (I use Google Chrome) can translate it for you.  

Photo from Michele Made Me

Michele Made Me has a great ornament overview, linking to 19 free tutorials she's put out over the last few years, and 3 paid PDFs.  

Photo from Grainline Studios

I am in love with this tiny narwhal ornament from Grainline.  She whipped up a bunch for an ornament exchange, and was sweet enough to share the pattern.  I may have to make one of these for my own tree.


I hope you have found inspiration for something new to grace your tree, or that of friends and family.  

What are your favorite tree ornaments?  Are they homemade or store bought? 

Missed something?  Check out The 12 Projects of Christmas.

Sunday, December 16, 2012

12 Projects: Tree Topper


When I was in first grade, we made angel tree toppers in girl scouts.  We put glue on some white fabric, wrapped it around a cone, and added a styrofoam head and ridiculous curly doll hair. Until recent years, when she's opted for a smaller tree, my mother has used my first grade angel to top the tree every year.

Since I purchased my slim tree, I've used a number of different things for tree toppers.  I've used a dollar store twig star, a wire reindeer, and various other home made solutions.  In short, i've been too cheap to purchase a store bought topper.  As I mentioned in the post about glittery candles, I'm really into the glitter trend that has been adding to Christmas sparkle, and I wanted to bring that to my tree topper.


My homemade, stash supply using, sparkly star tree topper!

Supplies used:
Cereal Box
Tacky Glue
Modge Podge
craft glitter (large and fine)
Felt
Scissors, paint brush and a Sharpie.  I realize I leave these basic tools off the supply lists a lot.  I imagine you lot are bright enough to cut things with scissors, but perhaps I should be more thorough?  Thoughts?


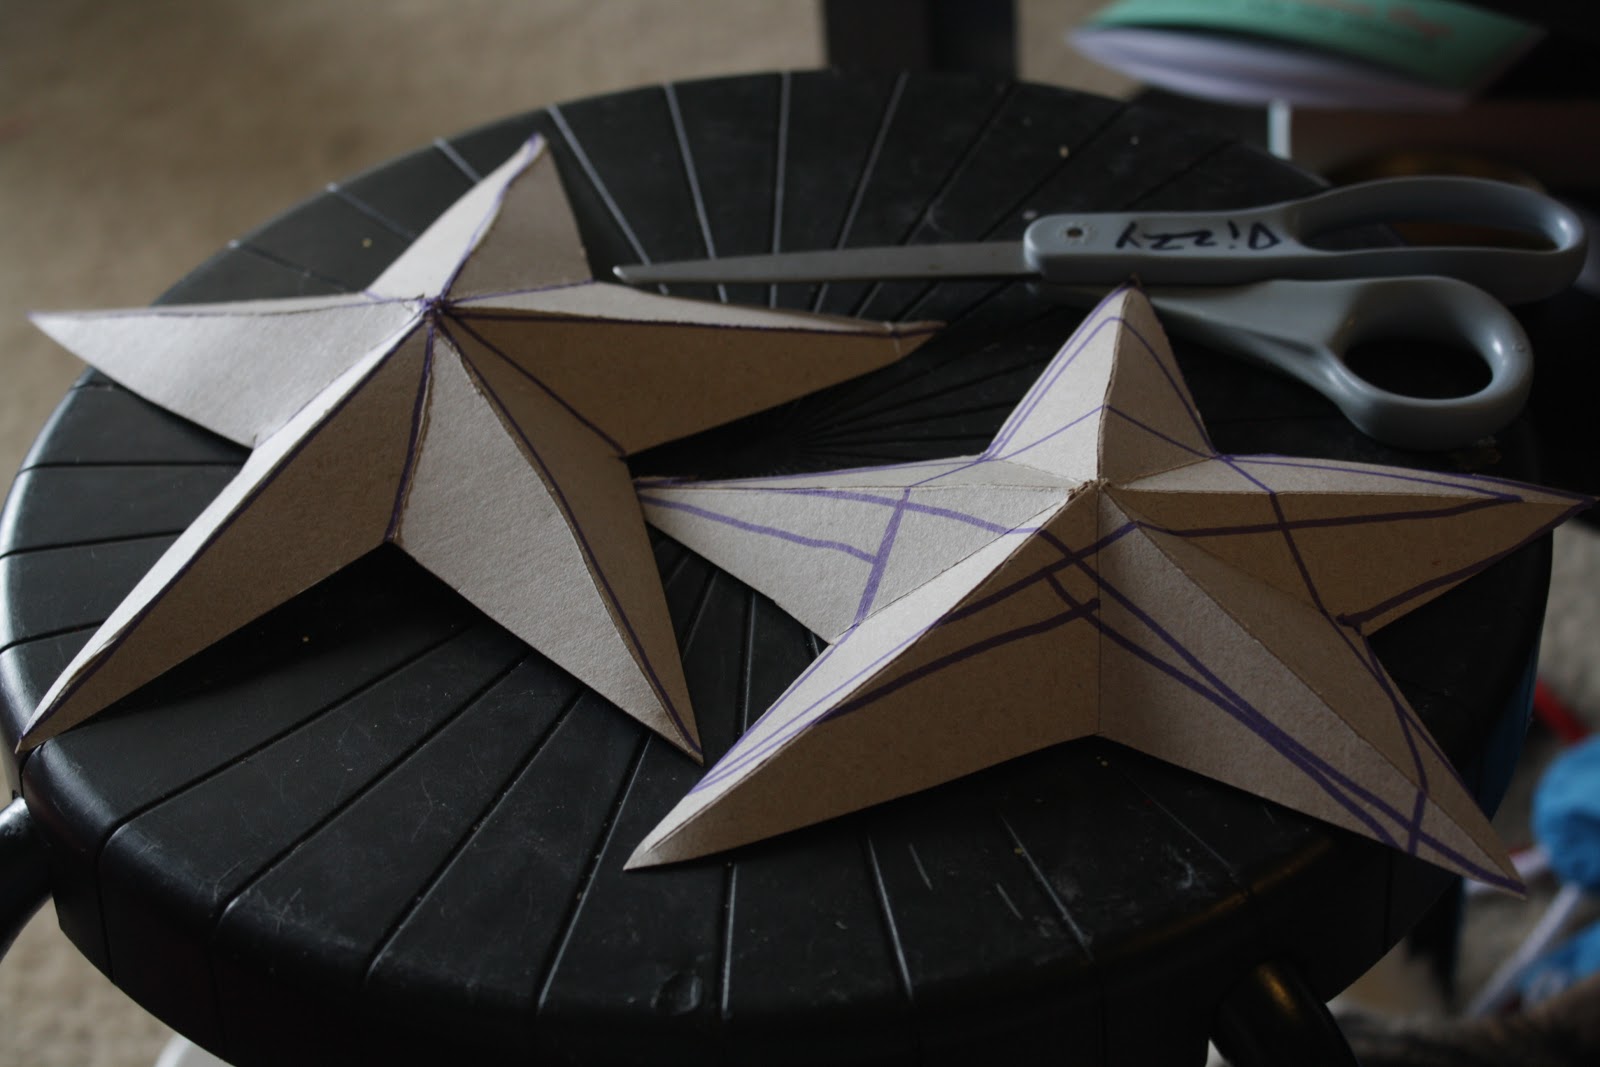
I followed this tutorial from The Glue Gun Girl to make cardboard stars out of a cereal box.  I had a really hard time drawing an even star, but I kind of like that my stars turned out imperfect.  If you need a perfect star, she links to some free star templates.  You don't actually need two for this project, I figured I could use the second one elsewhere.


Instead of painting a solid color, I mixed Modge Podge with glitter.  I started out with the same big gold glitter I used on my pinecone mini tree, but the spaces between the glitter flecks were too big, so I added a bunch of the Martha Stewart glitter in yellow gold and bronze.  


I painted it on my stars!  I was a little worried that the modge podge would get rid of some of the sparkle, or wouldn't cover the purple sharpie lines, so I laid it on pretty thickly.  I left my stars to dry overnight.


For the tree topper base, I made a cardboard cone using my mini tree tutorial.  I covered it in green felt, so it would blend in to the green tree.  


My star after drying.  Still sparkly, and not shedding glitter.  Success!  I did have to refold all the creases, as the weight of the modge podge flattened the shape a bit and made the cardboard a bit rubbery.  


I put glue on the tip of the cone and stuck it to the back of the star.  I also cut a little rectangle of felt, smeared it with glue, and wrapped it around the top of the cone and flat against the inside of the star. 


I let this dry for a few hours, glittery side down.


The star in it's new home on my tree.  I find it's imperfections charming, and a lot more me than something perfect.  

What do you guys top your tree with?  Where do you stand on the Angel/Star debate, or do you go with something entirely different?  


Missed something?  Check out The 12 Projects of Christmas.


Thursday, December 13, 2012

12 Projects: Tree Skirt


I bought my fake tree five years ago, for my first Christmas in New Jersey and the first I spent away from my family. The two cats I had at the time loved sleeping under it, so I didn't spend much money on a tree skirt.  In fact, I bought the cheapest one possible: a little red felt number from a big box store.  

Charlotte and Bailey under the tree, Christmas 2008

For my first Christmas in North Carolina and in my exciting new apartment, I wanted something new.  I wanted something cute and colorful with a vintage vibe, but nothing too precious as Bailey still loves to sleep under the tree.


I wanted to use up some of my scrap material, but I ended up supplementing with a few quarters of a yard from a JoAnn's sale.  I sketched up a simple scalloped pattern, and cut out a bunch of red and green wedges.  They are pretty imperfect, but i like it that way!


I was able to use the sleeves from two of the sweaters from the pillow project, and fabric scraps from a few past Halloween costumes.  I stitched the wedges together, alternating red and green.


Once it looked big enough, I layed it out on two yards of this green and red star fabric.  I sewed around and turned it inside out, making a quick and dirty lining for the underside.  I may add batting and quilt it in the future. 


It is a great size for my slim tree, but should fit around future trees.  Check out those peppermints!


What do you think of my tree skirt? 


Sorry for all the delays in posting, I've been caught up in other projects.  Most recently, I made one of two planned winter holiday dresses, and I even wore one to visit Santa.  
What have you been doing to get into the winter holiday spirit?


Missed something?  Check out The 12 Projects of Christmas.


Friday, December 7, 2012

12 Projects: Mini Trees


Everyone loves mini things, right?  I know I do.  For today's project I decided to make a bunch of mini Christmas trees to add to my holiday decor.  I decided to make two types of trees: pine cone trees, due to the sheer number of pine trees in my town, and some simple cone shaped trees out of cardboard.


Supplies:
Pine cones! I ended up finding three different kinds. I love the giant ones.
Fabric scraps.  I ended up using scraps from the pillow project and my Halloween costume
thin cardboard: I used recycled boxes
ribbon/sparkly trim
pom poms
glitter
glue
tape
paint


Cut out your pattern and trace it on to your cardboard. You can also print the pattern out directly onto card stock and use that as the base.  


 Fold over the tab on one side.  If you put tape on the inside of the tab facing out, it will make it easier to tape the cone closed.   Depending on the thickness of the cardboard, you may have to coax it in to the cone shape.

Cones!


I laid the pattern out on my fabric and cut around it to get the general shape.  This allowed me to center the cables, and is useful for any fabric with a directional design.


I smeared tacky glue all over the center of the cone and lined it up on my fabric.


I glued the fabric one third at a time, so i could keep the cables lined up and pull the fabric tight.


If you have binder clips or clothespins, you can use them to hold the fabric closed while the glue dries.  I didn't have either, so I just used more tape. I used double-sided tape to hold the fabric down on the inside, but you can just trim the fabric to meet the bottom of the cone.


On one of the cones, I laid out lines of double sided tape and wrapped it with this tinsel gift ribbon. You could do this with any kind of ribbon or trim, and this version is super easy!


My cone trees!

The pine cones were super simple!


This large one was decorated with little pompoms, attached with, you guessed it, tacky glue. 


The other big cone was painted with glue and sprinkled with the big red and gold glitter.


Just like the big glitter cone, the two white cones were painted with glue but this time sprinkled with leftover epsom salt from the last project.  I painted the edges of two of the smaller cones with gold and green paint.


My collection of mini trees really helped to round out my bartop display!  You can also see my hurricane snowstorms in their final resting place. The sparkly trees reflect the white lights really nicely!

You can easily make both of these projects your own.  They lend themselves to all kinds of creative embellishment.  You can easily make the cones bigger and smaller to fit your decor.

Are you guys decorating for the holidays?  Have you tried any of my ideas?  Let me know!  Drop me a link to your projects!

Missed something? Check out the rest of the 12 Projects of Christmas!